
How to gracefully switch to a new code signing cert on Mac

Founder of ToDesktop
Introduction
Transitioning from an individual developer's certificate to an organization's certificate for an Electron app on macOS can be a tricky process, particularly when it comes to maintaining a seamless auto-update experience for your users. In this guide, we'll walk through the steps to ensure a smooth transition between certificates, preventing errors and ensuring your app's designated requirements (DR) are met.
This guide is tested and works with:
The Challenge
When you distribute an Electron app with a certificate tied to an individual developer and decide to switch to an organization’s certificate for app signing, it can disrupt the auto-update installation process. This happens because the codesign requirements change, leading to potential errors during the update.
We've got your back though. Follow this step-by-step guide to transition your app to the new cert without any obstruction to your customers.
1. Understand the Current Signing Status
First, identify the designated requirement (DR) of the application when signed with the old certificate. You can do this using the terminal with the following command:
codesign -d -r- /Applications/MyApp.app
This will provide output similar to the below text:
Executable=/Applications/MyApp.app/Contents/MacOS/MyApp
designated => identifier "com.myapp.myapp" and anchor apple generic and certificate 1[field.1.2.840.113635.100.6.2.6] /* exists */ and certificate leaf[field.1.2.840.113635.100.6.1.13] /* exists */ and certificate leaf[subject.OU] = "XXXXXXXXXX"
2. The plan
Let's imagine that version 1.0.0 is released and your customers are using it. So here is the scenario:
- Version 1.0.0: Already released and signed with the old cert.
- Version 1.0.1: Not released yet. This will be signed with the old cert but will contain custom designated requirements (described in the next version).
- Version 1.2.3: In some future version, we can sign the app with the new cert and remove the custom designated requirements.
There is one crucial thing that we must be aware of. We we publish v1.2.3 then we should be sure very few remaining users are still on v1.0.0. This is because an update from v1.0.0 to v1.2.3 will fail.
3. Get the ID from old and new certs
What we want to do is get the "Organization Unit" from each of the certificates. This is usually the Team ID or the Developer ID. The easiest way to do this is to simply open the cert and copy/paste the value from the cert. The "Organization Unit" is in brackets after the Team/Individual Name. It should look something like this:
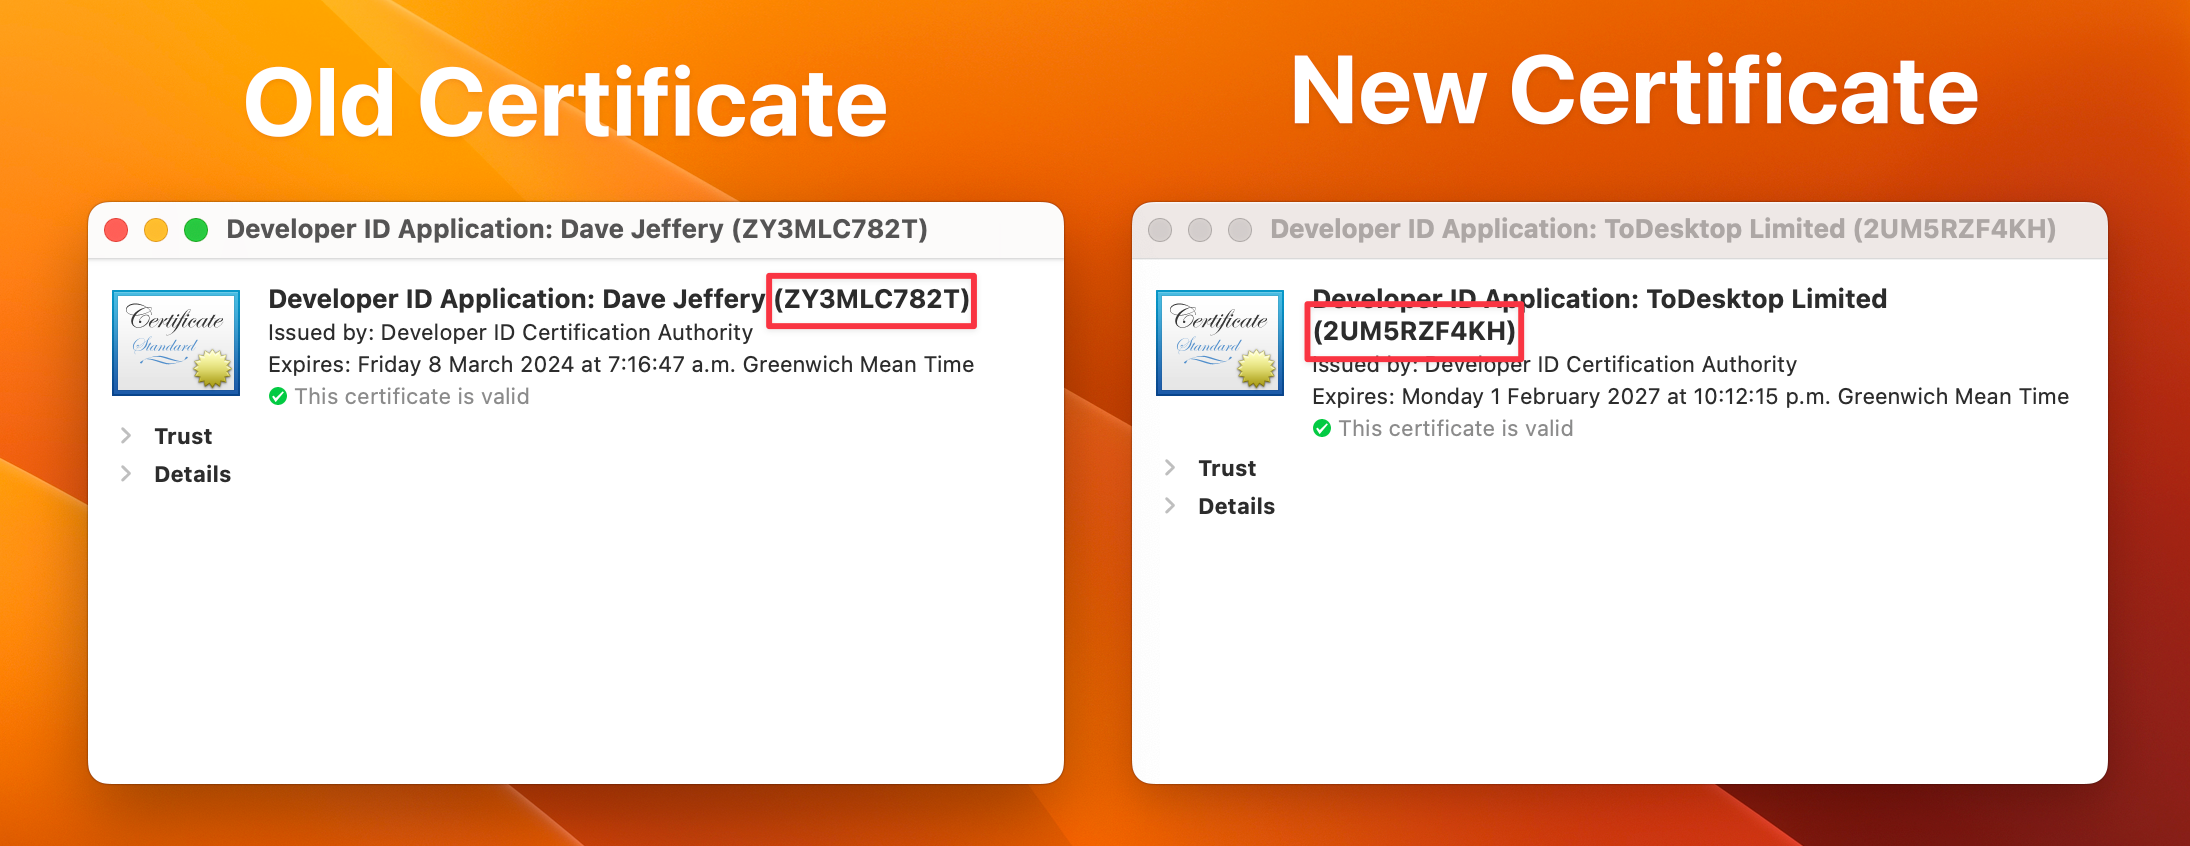
So, the IDs for the certs are:
- Old cert:
ZY3MLC782T - New cert:
2UM5RZF4KH
4. Update the designated requirement
Now, we want to take the designated requirement for our currently published app and add support for the new Team ID (Organizational Unit).
The general premise is that the old DR ended like this:
certificate leaf[subject.OU] = "ZY3MLC782T"
We can use an or gate to add support for the new cert.
( certificate leaf[subject.OU] = "ZY3MLC782T" /* old cert */ or certificate leaf[subject.OU] = "2UM5RZF4KH" /* new cert */ )
We also want to remove the identifier "com.myapp.myapp" from the start of the requirement
So, the general format for the new designated requirement is this:
designated => anchor apple generic and certificate 1[field.1.2.840.113635.100.6.2.6] /* exists */ and certificate leaf[field.1.2.840.113635.100.6.1.13] /* exists */ and ( certificate leaf[subject.OU] = "OLD_CERT_ID" or certificate leaf[subject.OU] = "NEW_CERT_ID" )
Note: this assumes that
certificate 1[field.1.2.840.113635.100.6.2.6]andcertificate leaf[field.1.2.840.113635.100.6.1.13]fields are on both certificates. If one of the certs is very old then this may differ. If so then your combined designated requirement may look a bit different.
Save this file as app-requirements.txt somewhere in your application's directory.
5. Update Configuration
Include the app-requirements.txt file in your configuration file under for your Mac app. Below are instructions for ToDesktop CLI, Electron Builder and Electron Forge:
ToDestkop CLI
In the todesktop.json file add the following:
{
  // ...
	"mac": {
	  // ...
	  "requirements": "./app-requirements.txt"
	}
}
Electron Builder
You can similarly add configuration to the Electron Builder configuration.
{
  // ...
	"mac": {
	  // ...
	  "requirements": "./app-requirements.txt"
	}
}
Electron Forge
The configuration for Electron Forge is a bit more complicated but you can add the following to forge.config.js.
module.exports = {
  // ...
  packagerConfig: {
    // ...
    osxSign: {
      optionsForFile: (filePath) => {
        return {
          requirements:
            'designated => anchor apple generic and certificate 1[field.1.2.840.113635.100.6.2.6] /* exists */ and certificate leaf[field.1.2.840.113635.100.6.1.13] /* exists */ and ( certificate leaf[subject.OU] = "OLD_CERT_ID" or certificate leaf[subject.OU] = "NEW_CERT_ID" )'
        };
      }
    }
  }
};
5. Release and Monitor
Refer back to the second section "The plan". We can now release a version of our app with the old code signing file but the updated designated requirements.
Once you're confident all users are on the updated version (may take several months), you can remove the app-requirements.txt file and its mention in the configuration.
Release a new version of the app, this time signed with the new certificate. No requirements file is needed, and the DR will list only the new certificate.
Conclusion
By following these steps, you can smoothly transition from an individual developer’s certificate to an organization’s certificate for your Electron app on macOS, ensuring a seamless update experience for your users.